
Managing time and projects efficiently is a vital part of any business. PRTime is an innovative solution that helps streamline these processes with its intuitive dashboard, time tracking, and project management features. Here’s a step-by-step guide on how to create a project and assign roles within PRTime.
Step 1: Understanding Your PRTime Dashboard
When you log into PRTime, you start on the “Free” subscription plan, which introduces you to two main modules on your dashboard: “Your Companies” and “Your Workplaces.”
Your Companies
Under “Your Companies,” you can set up a new company, albeit with some limitations on the free plan. Once set up, you can manage and control all its features, paving the way for project creation.
Your Workplaces
In “Your Workplaces,” you’ll find the company to which you’re attached. Here, you can log your hours and focus on your assigned tasks without the clutter of features that don’t pertain to your role, like creating reports or viewing other employees’ working hours.
Step 2: Navigate to Management
Accessing the management features is straightforward:
- On the left sidebar, click on “Management.”
- From the sub-menus, select “Projects.”
This is where the creation and assignment of projects take place.
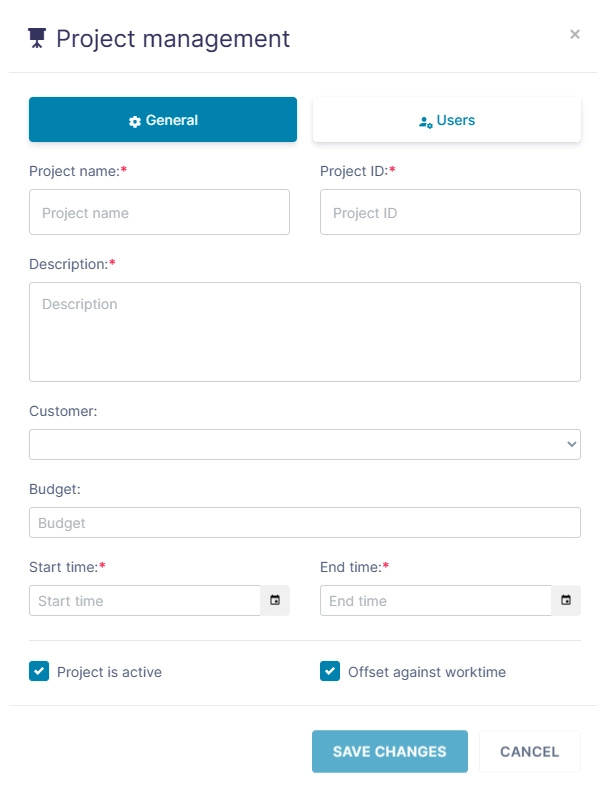
Step 3: Create a New Project
In the ‘Projects’ section, you’ll find “Company Projects.” Here’s how you can create a new one:
- Click the ‘Create’ button.
- Fill in the project’s details, including:
- Project name
- Project ID
- Description
- Customer
- Budget
- Start time
- End time
Once completed, your project is live and ready for team members to start logging time against it.
Step 4: Assigning Roles to Users
After creating a project, you’ll need to assign it to team members:
- Go to the ‘Users’ menu at the top.
- Enter the email address of the user you want to assign to the project.
This user will now be able to record time for the project you’ve assigned them to.
Step 5: Time Tracking and TimeTables
PRTime has two crucial functionalities for recording time: “My TimeTracker” and “My TimeTable.”
My TimeTracker
Here’s how to use the time tracking feature:
- Click on “Time Recording” on the sidebar.
- Select “My TimeTracker” to view or start a new recording.
- Hit “Start Recording” to begin tracking your time and “Stop Recording” to end it.
The time tracking data table will show the duration and breaks, and you can export this data as a CSV file for further analysis.
My TimeTable
For logging hours on specific projects:
- Select “Time Recording” and then “My TimeTable.”
- Choose the current month and add your working hours daily.
- Click “Add Project” to log hours for different projects.
At the end of the month, hit the “Complete” button to finalize the timesheet.
Step 6: Exporting Data
You can export the TimeTable in CSV and PDF formats to analyze the productivity and time spent on projects.
PRTime is an excellent tool for freelancers, employees, and managers alike. By following these steps, you can effortlessly create projects, assign roles, and keep track of time and productivity, all within a streamlined platform. This not only boosts efficiency but also ensures transparency and accountability within your company.
Ready to take control of your time and projects? Log in to PRTime and start organizing your business endeavors with ease.